Archive for the ‘In Studio’ Category
Keeping Busy Updating
Posted on: November 11, 2013
- In: In Studio | My Work
- Leave a Comment
I have been keeping busy online updating my society 6 and etsy store as well as a friend’s society 6 store and our joint tumblr. But I have been lacking in blog posts for sure! I have been doing some new paintings including playing around more with acrylic skins which has been my favorite stuff so far. I’ve always liked making collages and doing it with brightly colored paint is really fun. Some of those pictures are below. I also had a little sewing class at a local Jo-anns store and got a little bit of a better feel for my machine and have been doing little projects here and there on it. It has been going fairly well though I am still not that great. Photos I am sure will come when I get a better feel for it and start doing some funner projects. That’s all for now, more to come soon.


Neon acrylics
Posted on: October 1, 2013
If you haven’t noticed, I have a fascination with bright neon colors, and it shows up in my work. Recently I bought some neon acrylic colors from work to play around with. I had some sample acrylic mediums I have been playing with lately and wanted more acrylic colors to test out with them. I made 4 small (approx 4×6) text pieces with my new neon colors and some older colors I had. i used tape and cut up sticker sheets to lay down some shapes and strips to mark off certain area. I had a glazing medium that I mixed in the paint to thin it down a bit and also get some smoother, thinner layers. I really like the way they turned out however the color does look much better in person, my scanner doesn’t seem to pick up on the neon as much. Will definitely be doing more tests in the future but am currently in a getting messy with clay mood.


Fiddling About
Posted on: September 8, 2013
I’ve been working on a few different things in the past week or so. One being some throwing. I was going back to watch some ceramic videos that I had seen before to try some different ways of doing things. One video was about creating curved designs in bowls from artist Martha Grover, which can be seen HERE from Ceramics Arts Daily. I do like making waves and curves in my pottery and thought I would try this method. She actually goes through the bottom of the vessel and then attaches another piece to create the ruffle along the bottom. I went through the bottom and created some curves on top, waiting for it to dry out a bit before I get to adding more pieces.
Another thing I have been playing with are my encaustics. I have been trying to get some newer ways to build up a base layer and some texture then adding the wax on top. I stopped playing with the one pictured below after I burned myself a bit on my arm. I use a towel to pic up the cups of hot wax and pour them, but the towel end dripped into another cup and then slapped onto my arm. It’s a tiny burn but enough to make me pause on that for the time being. Also as a friend said (and I agree with) it kind of looks like rainbow cat poo in a litter box.
I also finished a second piece in a painting on ceramic stuff I have been working on in my spare time for a while. It’s kind of a snake like piece that is going to end up going outside as part of our growing lawn art.


Pattern plates
Posted on: August 28, 2013
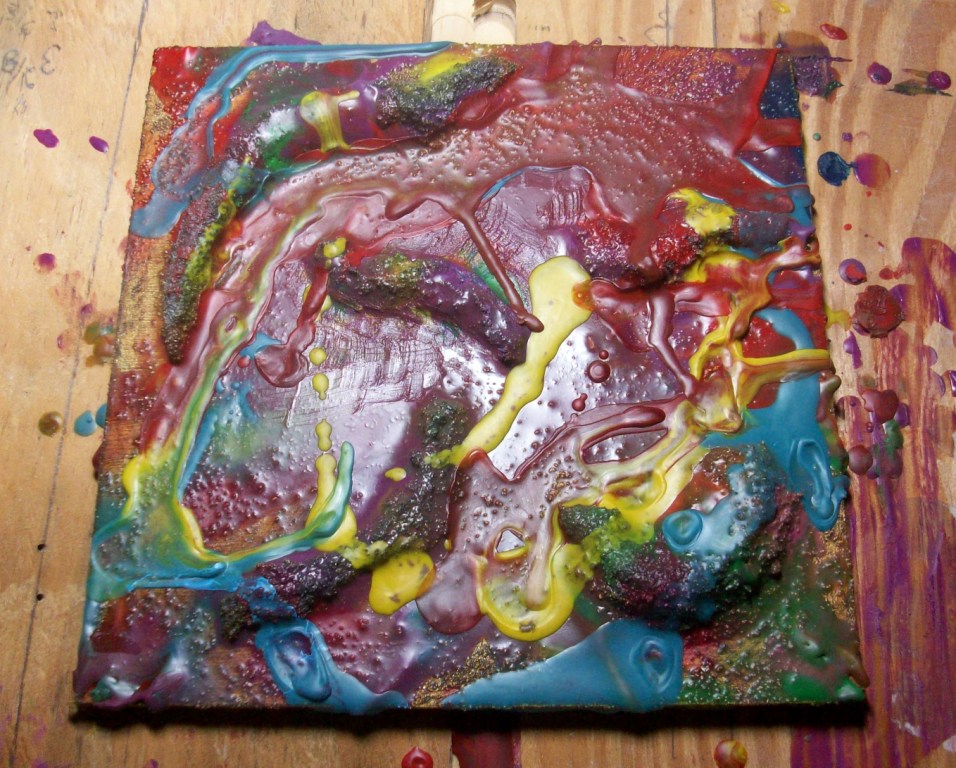
Last couple times I’ve been in the studio I have been playing with some texture plates and acrylic paints and mediums. I have some thicker mediums to build up shapes in encaustic work and for use on fired ceramic pieces, and some stuff that I picked up from a demo at work. I like how my little samples turned out which can be seen below. I am setting up a new one on a wood panel but just got done priming it today, next comes building it up! The first image was done with Golden Course Modeling Paste, the second image was done with Golden Heavy Gel. I really like the modeling paste and it will probably be the one I used more in the future. It feels kind of plastery and smooths out really well. I also like that it is an opaque white. The heavy gel was kind of like hair gel and was a little sticky, it didn’t leave as clean of an impression as a result of the stickiness. And the smooth gloss of it didn’t make it as absorbent for paint as the modeling paste. However, I like the texture and colors I used on the gel one more than the modeling paste one ![]()


Wheel Wobbling
Posted on: August 21, 2013
I am busy trying to reconstitute some clay but while waiting that out I tried to use some of my premade clay I had that was still a bit soft. However it took some muscling around and it still wasn’t ideal for throwing with. I did get some decent height out of it but it wasn’t consistent in the thickness, since some of the clay was hard to move. I was able to get it to do some draping and flowing more like fabric which was fun, but its not a good looking piece by any means, maybe it will be in the next scrap bin next time I reconstitute more clay.


Finishing some crafts
Posted on: August 16, 2013
Woke up to a headache caused by my little barking heathens/dogs. However, I decided to spend some time wrapping up some crafts in the basement before starting the rest of my day. To start off with I put some finishing touches on an ATC for a swap with a pig theme. I had a lot of stuff to choose from to add pig elements. I like the way it turned out in the end. Initially I had started using some plates to add some paint texture elements to an atc which I liked but I think it stands well on its own and I didn’t want to add pigs to it. I will save that one for another opportunity, or maybe as a test for something larger. Pictures of both are below.
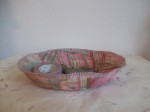
I also finished the fabric bowl I started a week or so ago. I added the trim around the top. It was regular fabric binding in white and I had painted it a few days ago to blend a little bit better with the fabric choices. Again the bowl is a little shallow and a little wobbly given the nature of how it was made, but a good little bowl for knick knacks, whatever happens to be lying around.
I also am including a picture of a swap I recently received. It was to fill a pencil bag and I got a few great little goodies, there was more than what is pictured including some notebooks but the little piggies are great and I love Little Miss and Mr Men stuff. I also love my fellow swappers 🙂


Pinteresting
Posted on: August 9, 2013
Yesterday I took to the late afternoon to craft away and looked to my Pinterest Crafticles Board for inspirations. After deciding that I didn’t want to get out a sewing machine or hand sew for that matter and eliminating like 1/2 the board I found 3 projects to play around with.
Project one: This pin showing you how to cut glass bottles. I’ve had this one for a while but never tried it, heard from people at work that it works. My dad had some glass tubes from work he wanted to cut into little bud vases so we tried it. Complete Bust for us! All we managed to do was light some cool fires. Not even a dent or scratch in the glass. Maybe they are too thick, or maybe my string wasn’t thick enough. Even tried with a rolled up tissue which made the best fire, but still got nothing.
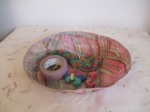
Project two: This pin showing really cute fabric bowls made from fabric scraps. I did two, bowls one out of fabric scraps and one out of paper. The hardest part is making sure the right sides are facing out or in depending on which layer you are on. Once you soak the strips in the mixture it is hard to tell sometimes as a result some of mine is facing the wrong way. I started putting them all in face down in the mixture to try and keep it straight. My fabric one is taking longer to dry than over night, I had to add a little extra mod podge mixture this morning to stick down some loose spots. But it looks okay. I wish I had a deeper form to work with, I was using some paper bowls. I do have pictures of the paper one, finished with washi tap along the edge. Again its not a perfect bowl but a good little dish for whatever you have lying around.
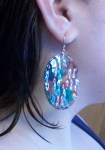
Project three: This pin showing you how to melt plastic beads to make a cake stand. So I didn’t need a cake stand and I wanted to try this on a small scale before I wasted a ton of beads and possibly ruin a pan. I used a foil cupcake pan I still had lying around, and a plastic beading kit that has literally been in my possession for years, now being put to actual use! They melted just fine but I wish they were a bit flatter, and they look stellar, I used some of the clear beads too so they would have more transparent properties. Then I used scissors to trim some rogue edges, sandpaper to smooth it down, and a power drill to make some hole. So far I have a pair of earrings and a hanger for our fabulous dead tree in the back yard. Will probably use the rest for more hangers. I used stretchy cord wrapped in washi tape for the hanger.


In the works
Posted on: July 15, 2013
Was back in the studio again today my arms were up to it today. They had been pretty weak feeling since a recent checkup left me with bruises from them trying to draw blood. I still have some faint bruises but my arms don’t feel like limp noodles anymore. Which was good because I had a sizable amount of clay to work with and I was going for something big!
I threw two vessels today a small slender one and a large round one. Both were made using the clay that I began reconstituting weeks ago. I probably have enough in my bucket to start the process all over again. It was a little wet but still manageable on the wheel. I am going to make a plaster slab a little bit later tonight with some help that will help dry things out a little faster than just setting them on canvas. I could always grab a spare hair dryer but I have always found that way of speeding up the process to lead to some issues, like being too dry in one spot and leading to cracking.
Below I have pictures of the vessels I threw today and a pic of the clay spinning before I made anything of it. It’s a good before and after transformation.


Meh Day
Posted on: June 30, 2013
Tried to get in some more time in the studio today but the bad weather outside was harsh on my mood. I think I should have napped before hand. I did manage to clean up a bowl and add some texture and pattern with a Iron Slip which I think will pop once this is fired. Prefired colors are always pretty bland. I was trying to make some slab work things with different patterned sheets I have but the clay for the most part was too wet and wasn’t picking up the pattern well. The one I did get I draped over a brick to help keep a shape I wanted. Now its drying out a bit.
On a side note, my best friend who I have linked to here before is a great artist and I recently started setting him up a Society6 page where you can buy his work as high quality prints, t-shirts, phone cases, etc. Check Paul Lapusan out.


Postcard Art!
Posted on: June 24, 2013
We’ve had some rather loud and windy storms the last two days here. Luckily I had today off and got to spend it indoors listening to the rain and thunder outside, with the occasional lightning crash changing the lighting conditions. I spent quite a bit of it in my studio mostly making postcards for some upcoming swaps. I have received some for these swaps already too. I got all mine done and ready to send off in the morning, hopefully it won’t be raining then too, but they are pretty well sealed. One is a Summer PC swap, and one is a Dr. Seuss themed swap. I had a friend who is an amazing pen and ink artist do the Seuss inspired drawings for me to use. To give them some color I mod podged some tissue paper over the top of them.
The pictures below show a scan of the original drawings, then with the tissue paper added. Also a picture of a summer finished pc, and Seuss finished pc, and on the left the Seuss pc someone sent to me.


